
How to Change Background Color in Photoshop cc 2024 ?
How to Change Background Color in Photoshop
Are you looking for a simple technique to change the background color of an image in Photoshop? Then this tutorial guide is for you.
There is no doubt that Adobe Photoshop is essential software that every graphic designer or photographer should have at hand if they want to stand out amongst others in the industry. The software renders thousands of services, from logo design to image editing. It’s a perfect software for changing the background color of an image.
With these great features, Photoshop is not without its pitfalls- people find the toolkit hard to operate. For this reason, many people have switched towards using low-standard toolkits that generate poor-quality outputs. What this means, in essence, is that Adobe Photoshop is the most versatile software to use, and no toolkit can stand it. But what could be done to make it easier to use this toolkit?
Creating guides on its different services is the perfect thing to do. In this article, we will share a guide that explains how to use Photoshop to change an image’s background color.
Table of Contents
Step-by-Step Guide to Change Background Color in Photoshop
Altering the background color of an image in Photoshop can be done in two ways.
First method: Use Pen Tool
The pen tool is one of the best tools for tracing objects without losing quality. In Photoshop, if you want to create a clipping path, you have to use the pen tool; there are no other options. So, in this section, we are going to show you how to change the background color in Photoshop using the Pen tool. Let’s get started!
What is the Pen Tool?
The Pen Tool (P) is a vector-based drawing tool that allows you to create paths using anchor points and handles. These paths can be converted into selections, masks, or shapes, giving you fine control over your designs.
Import an Image
Download and install Adobe Photoshop software on your Windows or Mac OS, then launch it to add an image.
To import a picture, tap on the ‘File’ button at the top left corner of your screen. A menu with a list of options will slide down. Choose ‘Open’ from the list, and you will be directed to your local drive, where your pictures are stored. Select your desired image and then hit ‘Open’.
Select the Pen Tool to Trace the Object
Now, you must select the object in the photograph using the ‘Pen Tool’. To use the tool, press the hotkey ‘P’ or choose ‘Pen Tool’ from the toolbar palette.

Next, zoom the image at least 200 – 300%, then trace the object in it. We called it a clipping path in the object.

Select & Smoothen the Edges of the Object
After tracing the object, you must smoothen the edges to remove those rough patches. To accomplish this, select ‘Path’ from the toolbar palette on the right-hand side of the program, scroll down, and click on ‘Make Selection.’ If you can’t see the paths panel, you can enable it from the top Windows menu.
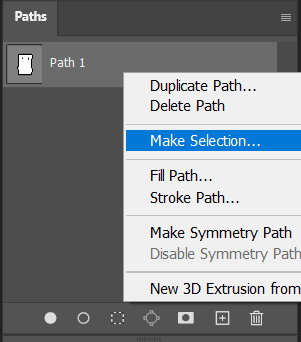
A new window will pop up showing the several options. Change the ‘Add Feather’ option to 0.5, then hit the ‘OK’ button.

Now, we have successfully selected the Object.

Duplicate the Background Layer
Select the “Background layer,” then press ‘Ctrl + J’. This command will automatically create the same background again, which will be called ‘Layer 1’ without any background color. When you have a duplicate background, disable the eye icon from the background layer. Now, the image will have a transparent background.

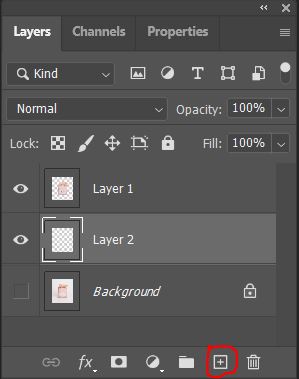
Create a New Layer and Set the Background Color
Next, you need to create a new layer called “Layer 2.” Click the new layer icon (+) on the layer panels and move it underneath Layer 1.
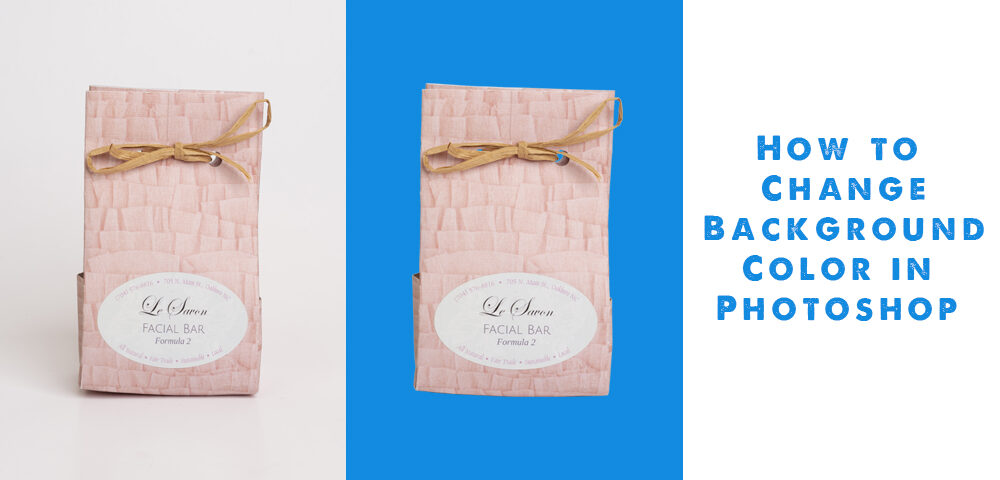
Once you’ve done this, set your preferred background color by clicking on the ‘Color Picker’ tool at the bottom left corner of the software. In this section, I used Blue (#128be0).

Select Layer 2, then tap ’Ctrl + Backspace’ to apply the new color.

Export the Image
After completing the steps above, you must export the image to your local drive. Do this by clicking on ‘Ctrl + S’ and then selecting a folder where it will be stored.
Second way: Use the Magic Wand Tool
The Magic Wand Tool in Photoshop is a quick and efficient way to make selections based on color and tone. This tool is handy for selecting and manipulating areas of similar color without manually tracing around them. Here’s how to use the Magic Wand Tool effectively:
What is the Magic Wand Tool?
The Magic Wand Tool selects pixels based on color similarity. When you click on an area in your image, it will choose all adjacent pixels within the clicked color’s tolerance range. This makes it ideal for selecting solid backgrounds, skies, or other uniform areas.
Add an Image
After downloading and installing Adobe Photoshop, launch the program and hit ‘Ctrl + O’ to open the local drive where your images are saved. Select an image and then click on ‘Open.’
Select Magic Wand Tool
Locate the ‘Magic Wand’ tool in the toolbar on the left-hand side of the toolkit and then click on it. The top will create a path around the image’s subject.
Select the Subject
To complete the above, click the ‘Select Subject’ icon at the top of your screen. Photoshop will instantly integrate the innovative AI feature to create a path around the subject.
Set feather
Now, find and click on the ‘Select’ menu at the top of the software, then click Modify–> Feather. Immediately, a drop-down menu will pop up, and a new window will appear on your screen. Adjust the ‘Add Feather’ to 0.5, then click ‘OK’ to validate your command.
Duplicate the Background Layer
Use the hotkeys ‘Ctrl + J’ to duplicate the current layer (Background Layer), and a transparent one will pop up (Layer 1). Disable the eye from the background layer to make your image background transparent.
Create a New Layer, then Set the Background Color.
Add a new layer to the list by selecting ‘New Layer’ from the Layer panel menu. The new layer is named Layer 2. Move Layer 1 above the new one, then set your background color. To do this, select ‘Color Picker’. A new window with loads of colors will appear on your screen. Choose one, then hit the ‘Ctrl + Backspace’ keys to apply the new color.
Save the Image
Now that you have accomplished your mission, change the background color of an image, click on ‘File,’ scroll down to save, and export the edited image to your local drive. FYI, you must select a folder where you want to save the file. Once you do this, hit ‘Save’.
Tips for Better Results:
- Use High-Quality Images: Higher-resolution images provide more detail, making the selection process easier and more accurate.
- Zoom In: Zoom closely on the edges while refining the mask to ensure precision.
- Feather Edges: Slightly feathering the edges of your selection can help create a smoother transition between the subject and the new background.
- Experiment with Colors: Don’t be afraid to try different background colors to see which best enhances your subject.
Conclusion
Changing the background color in Photoshop CC 2022 is a straightforward process that can dramatically enhance the visual impact of your images. By following these steps and practicing regularly, you can master this technique and apply it to various creative projects. Whether you’re preparing images for marketing materials, social media, or personal art, knowing how to change background colors effectively will expand your creative toolkit and elevate your work. Happy editing!
Also, You May Like to Read:
How to change the color of objects in Photoshop?
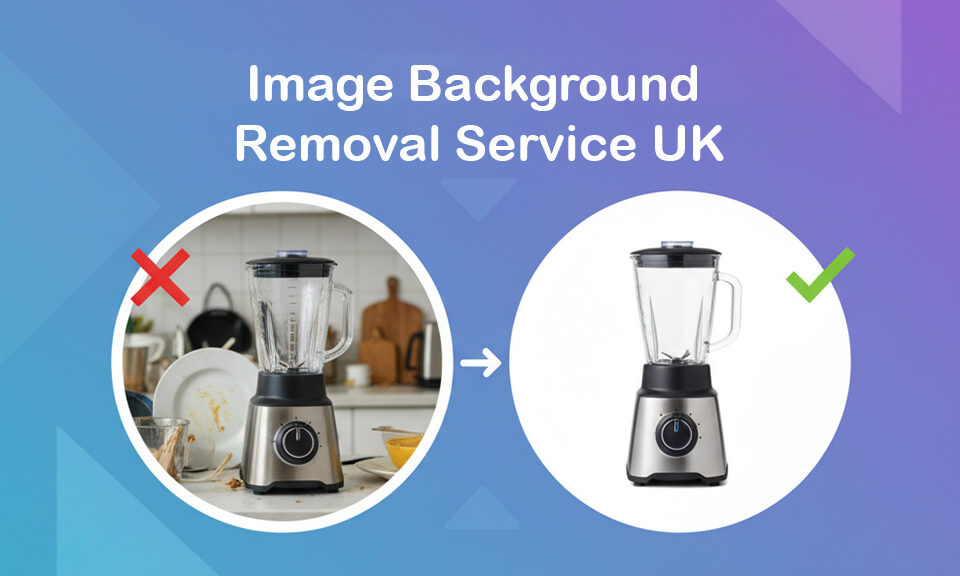
If you don’t have sufficient time, then you can hire us. We provide all kinds of background removal services at a reasonable price.


