
How to Make Beveled Buttons in Photoshop?

How to Make Beveled Buttons in Photoshop?
You are creating buttons for a website or any other graphic project. So you should add an angle to the buttons to look classic and set them apart from the surroundings. You can create a bevel button in Photoshop to follow a few steps.
In this article, we are going to show you how to create beveled buttons in Photoshop within minutes. If you are a newbie, then you are welcome to this article. As a Photoshop beginner, we hope it will be helpful for you.

Beveled button
Make Beveled Buttons in Photoshop by following the steps
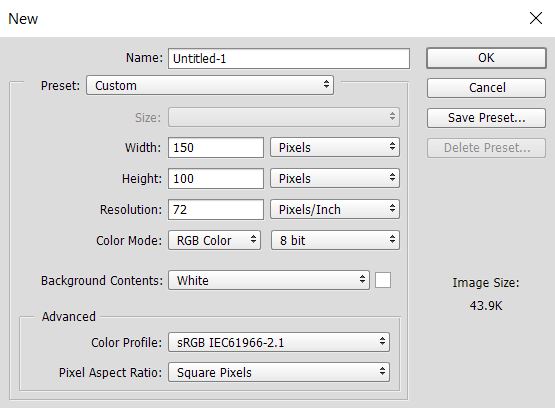
1. Open Photoshop then create a new window, Click File –> New or press (CTL+N),
Width:150pixels, Height:100pixels, Resolution: 72 pixels/inch, Color Mode: RGB color, Background Contents:White
Note: You can add any width and height, as you wish.
2. Create a new layer; from the top menu, click Layer->New–> Layer –> ok or Press (CTL+SHIFT+N). Then, choose the Rounded Rectangular Tool and make a button shape like at the left.
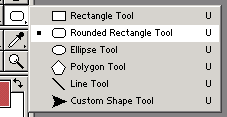
rounded rectangle tool
3. Next, right-click on the layer you made early and choose blending options. You can use the fx icon from the layer panel for blending options. From the blending options window, select the gradient Overlay, then follow the below image and click OK.
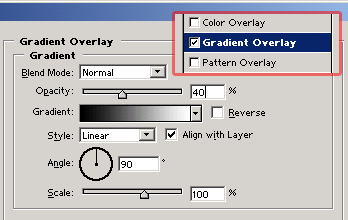
Blending Options –> Gradient Overlay
4. Now your button should look like the below image.

5. Select the layer and press CTL+Enter or Ctrl+Click on the layer to select it.

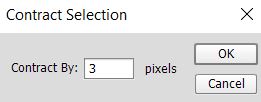
6. Then go to Select > Modify > Contract, Contract by 3 pixels. Now, create a new layer () and fill it with the same button color as shown to the left.
7.
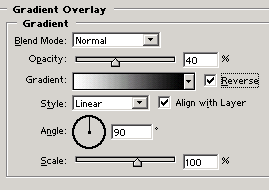
Right-click on layer 3 and chose the blending options.
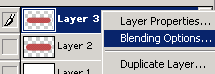
As shown below, don’t forget to tick Reverse. Otherwise, you won’t get the effect. Click OK; you are done!
8. Successfully created a beveled button


1 Comment
that a great post as usal