
How to Convert Image to Vector in Illustrator ?

How to Convert Image to Vector in Illustrator ?
Vectorizing an image is easier than ever with the advent of Adobe Illustrator. This toolkit lets you quickly turn your JPEG and PNG images into vector form without losing quality. Although the process can be tedious, this tutorial guide will simplify it. This article will show you how to convert an Image to a Vector in Illustrator cc 2021. Also, our step-by-step guides help you to convert low-resolution images to high-resolution vector files within a few minutes.
But before we dive into the stepwise guide required to convert images to vector form in Illustrator, we must let you understand what vector tracing means.
Table of Contents
What is Vector Tracing?
Vector tracing converts JPEG/PNG or raster graphics or images into vector form. Alternatively, it can be defined as the recreation of an image from an existing one using vector software like Adobe Illustrator. This form of drawing considers the magnitude and direction of all the details of the image. These features (magnitude and direction) can be altered to suit your requirements. What this means, in essence, is that you can manage the size of an image. So, how can you perform this operation? Can you draw a vector?
How to Convert Image to Vector Using Adobe Illustrator
Here is the stepwise guide you need to follow when using Adobe Illustrator to convert your image or graphics to vector:
Step 1: Open the Image in Adobe Illustrator
On the complete download and installation of Adobe Illustrator on your PC, click the ‘File’ button at the top left corner of your screen, scroll down to ‘Open’, then click on it. You will be directed to your local drive, where your images are stored. Select your preferred photograph, then tap the ‘Open’ button.
Step 2: Trace the Image
After adding the image, select ‘Window’, and a drop-down menu will appear. Choose ‘Image Trace’ from the options, and a panel titled’ Image Trace’ will appear on your screen.

Now, find the option ‘Preview’ and tick it. Your image will appear in vector format. Mind you, it might not appear as clean as you want, but don’t worry—there are a few steps to rectify this effect.
Step 3: Select a Suitable Mode and Color for your Drawing
Next, locate and click on the ‘Mode’ drop-down menu, then select any of the following modes:
- Color
- Gray
- Black and White

Image credit: Stickermule
Next, adjust the slider for any of these three modes you’ve selected. When making this adjustment, you should look at your image to see whether or not it suits what you want. For instance, when your preferred mode is ‘Color’, and you adjust the slider, the image below is the result you will get:

Image Credit: Stickermule
Step 4: Advanced Settings
Once you’ve completed the step above, toggle the ‘Advanced’ settings menu down, and more options will appear on your screen.
Many options will appear underneath this setting; let’s start with the ‘Path’ slider. Adjust the slider to fit your desire. See the image below to understand this:
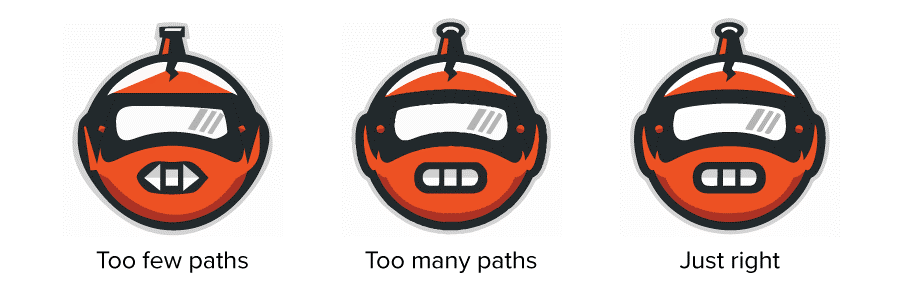
Image Credit: Stickermule
Next is the ‘Corners’ slider. This will help you adjust the corners of your designs. For a sharper curve, move the slider to the extreme right. But if you want a round curve around your design, move the slider towards the left till it fits your needs. Here is a visual representation of this:
 Next, we have to adjust the ‘Noise’ slider. The ‘Noise’ slider instructs Adobe Illustrator to pay little or no attention to parts of your design that fit within the pixel amount set. This feature lets you eliminate artifacts present on your design or image without compromising the quality. However, you have to be careful when using this feature, as it might erase those vital parts of your designs, making your work unattractive.

Convert image to vector in Illustrator.
Step 5: Export the Image
When you are done vectorizing your image following steps 1 through 4, the final thing to do is export the edited image to your hard drive. Use the hotkeys ‘Ctrl’ + S. Another way you can do this is by clicking on the ‘File’ option, scrolling down to where ‘Save’ is, and clicking on it, and a new panel will open. Select a folder to save the image, then hit the ‘Save’ button.
Now that you have the tutorial guide to vectorize your JPEG/PNG images, you shouldn’t struggle to execute the task. Although the guide is simple, you must practice as often as possible to achieve perfectionism. However, we recommend that you seek Clipping Path Creative assistance if you desire perfectionism. You might be wondering how the process works at Clipping Path Creative Inc. Well, the following few paragraphs will explain the process.
Vector Tracing Services at Clipping Path Creative
Clipping Path Creative is a multinational company that renders countless photo/graphics editing services such as background removal, color-changing, car photo editing, photo retouching, banner design, clipping path, Vector conversion, and many others. Also, we offer you the option to remove the watermark from the Shutterstock vector file, and then you can use it anywhere without any attribution. These services are executed using Adobe Photoshop and Illustrator– two powerful photo editing/graphics designing software. The company uses the Pen Tool to implement virtually all of its photo editing tasks, and the results are top-notch. Also, it offers a competitive price for the service it provides. Select from the several price plans the company supports, and you will be amazed at the magic performed on your images. So what are you waiting for?
Contact Clipping Path Creative today for all your photo or graphics editing jobs.
Conclusion
By mastering these steps, you can effectively convert raster images into scalable vector graphics, enhancing usability across various projects. Vectors are particularly valuable for logos, icons, and illustrations that must maintain quality at different sizes.
Regular practice and experimentation with different images and tracing settings will improve your skills and confidence in using Illustrator for vector conversions. With these techniques in your toolkit, you can create professional and versatile vector graphics that stand out in any design context.


