
How to use liquify tool in photoshop
Photoshop is one of the most powerful photo editors worldwide. It’s loaded with fantastic features that help you edit images brilliantly so they appear appealing as if they were touched by a professional, even when you aren’t. With Photoshop, you can conveniently perform several editing services, from removing background colors to adding new ones.
Another amazing service you could use Photoshop for is modifying a subject or object. The liquify tool in Photoshop allows users to manipulate or adjust people’s body size and shape conveniently. The liquify tool is simple to use, but many users find it difficult to implement.
Do you fall into this category of people? If so, we are here to help you out. This article will discuss how to use the liquify tool in Photoshop. Continue reading!
Table of Contents
1. Import an Image
After installation, launch Adobe Photoshop on your PC and click on the File icon at the upper left corner of your screen. Select Open from the options that pop up underneath the drop-down menu. Photoshop will redirect you to your local drive, where your images are stored. Please select an image file and tap on Open to upload it.

2. Copy and Use the Image as New Layer
Now that you have successfully added the photograph press the hotkeys CMD + Option + Shift + N, and a new layer will appear. Once done, use the hotkeys CMD + Option + Shift + E to duplicate the image and paste it on the new layer. Using a Windows operating system, use Ctrl + Alt instead of CMD + Option.

Another way is you can duplicate the layer very easily and quickly. On Windows, use the command Ctrl+J & on Mac, press the command on the keyboard CMD+J.
{Note: Select the background layer, then apply the command line}
3. Open the Liquify Tool
Once you have completed the above, please launch the liquify tool using the hotkeys Shift + CMD + X (Mac computers) or Shift + Ctrl + X (Windows operating system). However, before launching the liquify tool, select the new layer. Another way to open the liquify filter tool is by clicking Filter > Liquify.

4. Tools Underneath the Liquify Filter
The liquify filter contains several tools that you can use to manipulate or distort the different parts of a subject or object in an image. When you launch the liquify filter, you will find seven (7) icons on the left sidebar and the brush option on the right-hand side.

For advanced features, tick the box underneath Advanced Mode. Once done, twelve (12) influential icons will pop up with several advanced brush and mask options. Find below what each one of the 11 icons is designed for:
W – Forward Wrap
With the Forward Wrap feature, you can adjust an image pixel to suit your preference. It lets you push a selected portion/area of a photo in different directions. Forward Wrap enables you to adjust the shape of any object or subject on an image.
R – Reconstruct Tool
Did you make a mistake while using the liquify tool? You can undo such an error with the snap of your fingers by holding the hotkeys Ctrl + Z. You can also hold the keys multiple times to return to previous image versions.
E – Smooth Effect
Do you feel you went too heavy when adding an effect to your image with the liquify tool? You need not worry, as Photoshop has your back. With a smooth effect, you can unload those heavy touches you’ve made on your image.
C – Twirl Clockwise Tool
By holding the Alt (or Option for Mac) key on your Windows keyboard, Photoshop will twirl your image in multiple directions without distorting the quality.
S – Pucker Tool
Here is another fantastic tool on Photoshop’s liquify dialog box. The tool helps you move the image pixel toward the center. Here is a related image:
B – Bloat Tool
The Bloat tool offers the opposite result to the Pucker tool as it helps you move the image pixels away from the center. To activate this tool, hold the Alt button.
O – Push Left
Looking for a tool to move a section of your image to the left edge of the brush? The Push Left tool is what you need. Hold down the Alt key and move the selected portion of the image in the desired direction.
F – Freeze Mask Tool
It’s easy to distort unwanted sections of an image while editing. But did you know you can prevent that? The Freeze Mask tool allows you to easily protect an area of the image from manipulations.
Here is the corresponding image for the freeze mask tool:
D – Thaw Mask
The Thaw Mask tool is the opposite of the Freeze Mask tool. It lets you unmask the protected or frozen part of an image.
H – Hand
Do you need to move your image around the Photoshop window page? Hold down the Spacebar button on your keyboard to activate the Hand tool.
Z – Zoom
The Zoom tool allows you to magnify and reduce image size without hassle. It enhances your view and makes editing more accessible and faster.
A – Face Tool
Making adjustments to your face in a photo is absolutely easy with the Liquify tool. The Face tool is designed to recognize faces in an image and separate them into different portions, such as the forehead, eyes, nose, mouth, and chin.
5. Face Aware liquify
Face-Aware Liquify is a fantastic feature of Adobe Photoshop that allows users to easily take their portrait photos and make subtle changes with just a few clicks. Using this feature, you can adjust your subjects’ facial features without having to manually move each one individually. With Face Aware Liquify, you can quickly and easily reshape eyes, noses, mouths, and other facial features to enhance or soften your subject’s expressions.
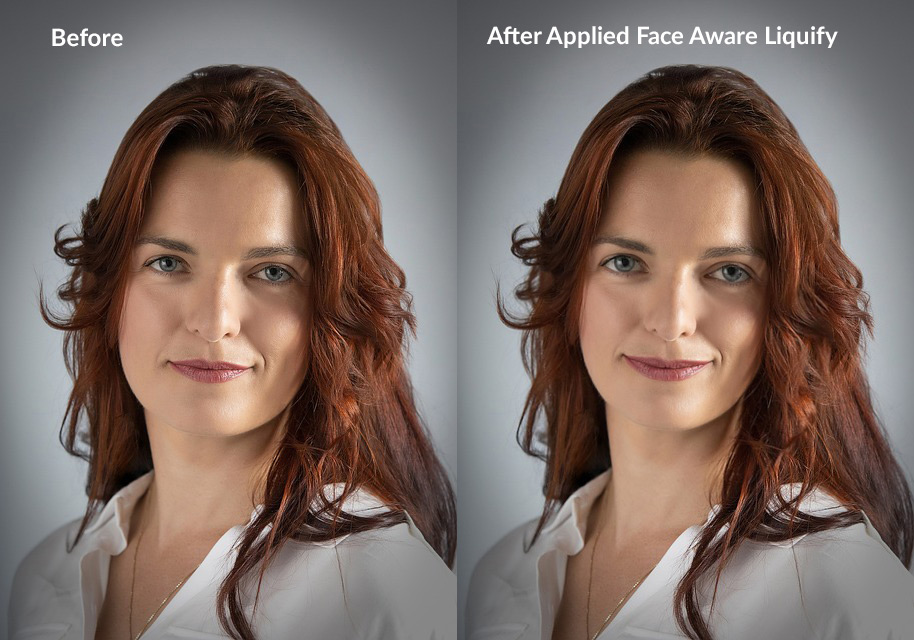
The process is simple: after loading the photo into Photoshop, the user selects “Liquify” from the Filter menu. The image then appears onscreen with adjustable control points at key areas such as the eyes, nose, and mouth. You can then drag these points around to change shape by adding or subtracting pixels until you achieve exactly your desired look.

Benefits of Using Face-Aware Liquify tool
Face-Aware Liquify is a potent and versatile tool that can help you quickly and easily improve the look of your images. From correcting minor imperfections to enhancing facial features, Face-Aware Liquify provides a wide range of benefits that make it a must-have for any photographer or digital artist.
One significant benefit is its ability to retouch and refine facial features without compromising the overall integrity of the image. With just a few clicks, Face-Aware Liquify can subtly enhance eyes, cheeks, and other facial features to create more striking photos with a natural look. In addition, it offers precision control over each feature so that you can make subtle changes or dramatic transformations at your discretion.
Limitations of Face-Aware Liquify
The Face-Aware Liquify feature in Adobe Photoshop is a powerful tool for transforming facial features, but it has limitations. This article will discuss the practical and technical limits of this popular feature.
Face-Aware Liquify allows users to reshape facial features with just a few mouse clicks. This feature is ideal for portrait photography, as it can tweak minor imperfections or create more dramatic changes, such as enhancing cheekbones or enlarging eyes. However, it does have some limitations when editing existing photos. For instance, if an expression has already been captured in a photo, Face-Aware Liquify cannot change the expression without distorting the image itself. Additionally, this feature may not be practical on larger images with multiple subjects; the liquified areas may become blurred or distorted if they are not adjusted accurately enough.
6. Additional Settings
Most of the advanced features listed above have numerical values that you can adjust accordingly. To do that, click on the corresponding button on the right-hand panel of your screen and change the values to suit your preferences.
Video tutorial
Conclusion
Using the Liquify tool shouldn’t be an issue anymore with this tutorial guide at your fingertips. We’ve provided a detailed description of what the tool is and how it works. You should use this knowledge in your next project. We are certain you will get professional results without stress.
Reference: https://helpx.adobe.com/photoshop/using/liquify-filter.html


