
How to Use Ring Light for Product Photography?
Do you wish to take incredible product photographs with ring lights as your lightning source? Then, keep reading to discover how this could be accomplished.
Ring Light has become a global need, especially in the photography industry. That’s because of the flexibility and superb continuous lightning it provides during a photoshoot. Besides photography, ring lights are also applicable in the video production industry, where they act as a source of lightning when creating footage. Although this circular-shaped artificial lightning object can sometimes be pricey, it’s worth it as it provides your images with that perfect glow you desire.
Doubting this? Let’s see why they are the perfect choice for product photography.
Table of Contents
Why are Ring Lights Good for Product Photography?
A criterion determining whether a lightning source is suitable for product photography is the ease with which it can be manipulated. Based on this, we confirm that a ring light is the best for your product photography. You can control the amount of lightning generated from a ring light by moving it to and fro until you get the desired amount to shoot fantastic product photographs.
Also, you can leverage the circular part of the design to prevent glare and shadows from appearing on your product image by placing your camera right at the center. See the image below to have a visual understanding of what we are saying:
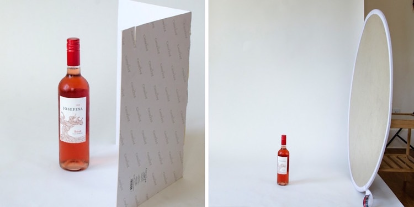
Furthermore, ring lights give the end-users of your product a clear view by exposing every part of the product while keeping it away from the background. The output becomes bright and sharp, making your product photograph aesthetic and eye-catching, helping you raise customer demands.
Convinced about our report on ring lights?
And now you want to use it in your product photography shoot? It would be best if you had the stepwise guide to do this. So read on.
How to Use a Ring Light for Product Photography?
Using a ring light for product photography can significantly enhance the quality of your images by providing even, flattering lighting that reduces shadows and highlights details. This guide will walk you through using a ring light effectively to achieve professional product photos.

Step 1: Choose the Right Ring Light
Select a ring light that fits your needs and budget. Consider the following features:
- Size: Larger ring lights provide more even lighting and are ideal for more oversized products.
- Brightness Control: Adjustable brightness allows you to control the intensity of the light.
- Color Temperature: Some ring lights offer adjustable color temperatures, which can help you match the light to your shooting environment.
Step 2: Set Up Your Studio
- Background: Use a clean, uncluttered background that complements your product. White or light-colored backgrounds work well for most products.
- Positioning: Place the ring light on a stand and position it directly in front of your product. Ensure that the light encircles your camera lens to achieve even illumination.
Step 3: Position Your Product
- Angle: Position your product at an angle that highlights its best features. Experiment with different angles to see what works best.
- Height: Ensure the product is at eye level with the ring light to achieve consistent lighting.
Step 4: Adjust Camera Settings
- ISO: Set a low ISO (100-200) to reduce noise and capture sharper images.
- Aperture: Use a small aperture (f/8-f/11) to ensure the entire product is focused.
- Shutter Speed: Adjust the shutter speed to control the exposure. Start with a speed of around 1/125 and adjust as needed based on the brightness of the ring light.
Step 5: Take Test Shots
- Take a few test shots to check the lighting and exposure.
- Adjust the brightness of the ring light and camera settings as needed to achieve the desired look.
Step 6: Fine-Tune Your Setup
- Reflectors and Diffusers: If needed, use reflectors to bounce additional light onto your product. Diffusers can help soften the light and reduce harsh shadows.
- Distance: Adjust the distance between the ring light and the product to control the light intensity and spread.
Step 7: Capture Your Images
- Take multiple shots from different angles to capture various aspects of your product.
- Use a tripod to ensure stability and consistency in your shots.
Step 8: Post-Processing
- Editing: Use photo editing software like Adobe Photoshop or Lightroom to enhance your images. Adjust brightness, contrast, and sharpness to make your product stand out.
- Background Cleanup: If necessary, clean up the background to remove distractions or imperfections.
Tips for Better Results
- Consistent Lighting: Keep the lighting consistent for all shots to maintain a cohesive look.
- Avoid Reflections: Be mindful of reflections on shiny surfaces. Adjust the angle or use polarizing filters if needed.
- Practice: Experiment with different setups and lighting configurations to find the best for your products.
Conclusion
Using a ring light for product photography can dramatically improve the quality of your images by providing even, flattering lighting that highlights your product’s best features. By following these steps and practicing regularly, you can master ring lights and create professional-grade product photos that attract and engage your audience. Whether you’re shooting for an e-commerce site, social media, or marketing materials, the proper lighting can make all the difference. Happy shooting!


