10 car photography tips – to capture better images of cars

It is more complex than you might think at first. If you have ever tried to photograph a car, you already know that. Although taking a clear and concise picture of a vehicle can be straightforward, it is much more demanding than expected. How can you adequately capture the car’s design, details, and essence in a photo?


Every time I take pictures of a car, I learn something! I would, therefore, like to share some basic car photography tips with you so you can get started quickly and better understand this interesting niche in the world of photography.
Table of Contents
1 Take pictures of cars at the right time
The most common mistake people make when taking pictures of cars is doing it at the wrong time of day. The best time to take pictures of cars is a few minutes after sunset or a few minutes before sunrise. The time around the blue hour is simply the best. Use a tripod and harmonious light that gently falls on the paint.

2 Look for reflections
It’s one of the best car photography tips for the photographer. Clear lacquer cries out for reflections. It would be best to always watch these when taking car photos. Take a look around you and check what is visible in the reflections on the surface of the car. A car (especially a new, shiny one) is like a mirror, so the environment is critical. Avoiding reflections becomes difficult, but with the choice of background, you can at least influence them.
To begin with, try an open space such as a field or a parking space behind you. Buildings or trees in your back are off-limits. One of the most important things you want to show with car photography is the car’s design lines. Unfortunately, reflections can quickly spoil these curves.
Car photography tips
So be very careful. You don’t want to have a reflection of yourself in the photo. Place your camera on a tripod if you can’t avoid your reflection. With the time-release or a remote release, you then have the time to distance yourself far enough from the recording field.
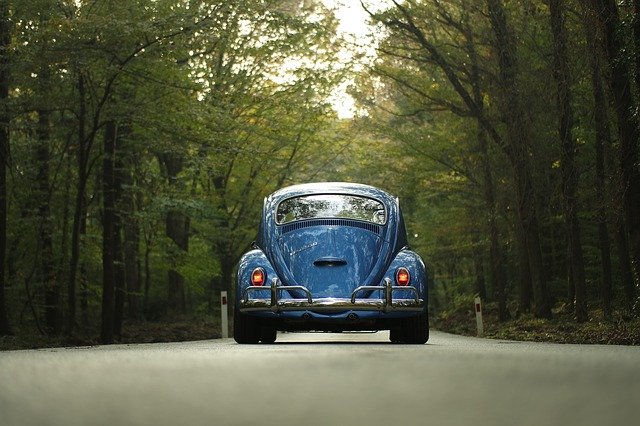
3 The color of the car
All-color paintings react differently at different times of the day, accompanied by different lights. Most paint finishes hate direct sunlight, but some go very well with it. Just look at this baby blue beetle photographed in the middle of the day.
4 Driving snapshots
Particularly cool car pictures are created when photographing the car from another moving vehicle. But please be super careful when you do this – watch out for signs on the roadside! Take pictures of your car from your window at around 60 km / h. Use a shutter speed of 1/100 second.
With this setup, you will later see excellent movement in the road and wheels in your picture. You can even reduce the shutter speed a little more to increase this effect. However, the longer the shutter speed, the more likely it is that your picture is too blurry and, at most, nothing will be recognizable. This alpha was photographed at 70 km / h before sunset and with a shutter speed of 1/80 seconds.
5 Background
Make sure the background matches the car and the theme. Avoid showing things in the background that distract the eye. Things like trash cans, power lines, and other cars can kill a picture. This Aston Martin’s background was simple. The orange paint harmonizes with the color of the environment—the soft sunlight.
6 Pan for motion blur
Another excellent car photography tip: Stand on the side of the road and take pictures of moving cars to bring some movement into your photographs. Follow the vehicle with your lens in one smooth movement and set the shutter speed to 1/125 second. It’s effortless – you will be amazed! This Auro was taken with an exposure time of 1/125 second and a focal length of 200 mm. The car drove at an estimated speed of 60 km / h. These settings result in an excellent distortion effect. Learn more about this remarkable effect, which is also called motion blur.
7 Angle
Before you start auto-shooting, you should closely examine the car and consider which features you want to highlight. Because you can deduce from which angle you have to take pictures. Just as with people’s photography, perspective plays a crucial role.
To get started, you can take photos at eye level. To take memorable snapshots, you should try different perspectives and viewpoints. A prevalent variant is taking pictures from just above the ground. This gives the car an imposing and threatening look. Experiment and find out for yourself what works best for you and your vehicle.
Depending on the angles you choose, I recommend a tripod for full shots of the car. However – don’t just leave your camera on the tripod. For all the beautiful angles, you need a hand gesture!
8 Let the car interact with nature
Try to relate the car to the environment. For example, do you have a pickup or off-roader with a 4 × 4 drive? Then an open area fits very well. Whirl up some dust or look for harsh environments. A smart would certainly be placed incorrectly in this environment 😉
9 Capture details in car photography
External details
Once you have photographed the full shots of the car, you can think about any external detail shots. These will help to improve your photography portfolio significantly. After taking the first few pictures by car, you should know the main design features. Take a good look and try to photograph details such as body shapes and lines, manufacturer’s marks, wheel structures, and grille. Again, it is essential to think about the lighting and angles for the shots. Don’t just assume that the previous settings work just as well for the detail shots.
Inner details
Many interesting inner details are also worth photographing. The manufacturer’s logo will appear many times inside the car. Ensure enough light for the shot, mainly if you photograph a location in the evening light. Perhaps you should wait until you can turn on the light and use it effectively. It would be a shame to miss the details.
10 Take car pictures at night
That may sound overwhelming, but you’ll be amazed at how easy and awesome it is! The biggest secret to taking pictures of a car at night is finding a place in complete darkness. Any street light or even a full moon can make life difficult.
Once you’ve found a suitable location, mount the camera on a tripod. Set your ISO to 100, the shutter speed to 30 seconds, and the aperture to f / 9. Once the shutter opens, take a robust and constant light source and run around the car to ‘paint’ with it. An ordinary flashlight will do the trick.
11 Car Image post-production
The creative process is not over once you press the shutter button on your camera. There is still a lot you can do with your photo afterward, and we really want to make it extraordinary.
We use Adobe Lightroom and Photoshop to edit my car photos because they allow easy adjustment of light highlights and shadows. For example, if you have to assert yourself against a bright sky in a sunny outdoor scene, you should first tone down some highlights. Next, look at the car itself – does it fall in the shadows? If so, you should lighten the darker areas a little. You may even want to use Lightroom’s correction brush tool to “paint” the car so that it is brightened without lightening the background itself. If you don’t know Photoshop, hire a car photo editor company.

There is no right or wrong way to proceed post-processing. If time permits, play with different things and determine which approach you can use to achieve extraordinary effects. Just as you choose a location for your photography, think about the subject of the car when you edit the photos. With this car photo, I wanted to keep the beautiful autumn landscape. I used warmer tones in the background and lightened the car to make it stand out from the scene.


1 Comment
Great photography tips